November 02, 2011

M&M Costumes

For Halloween this year, I made M&M costumes for my husband, Boo, and myself!


Materials:
String
Sharpie marker
 Pencil
Scissor
A piece of regular printing paper
Felt in M&M colors of your choice
(Don't forget white felt for the "M")
Batting
Hot glue gun
Sewing machine 
(Although sewing is not necessary; you can use Steam a Sem)

I got everything from Joann's. I believe the felt material was about $2.50 per yard, and I used a coupon (20% off entire purchase), so it was a great deal. I got 1.5 yards for one toddler, and 3 yards for one adult. 

Boo was purple, the Husband was yellow and I was green M&M.

Let's get started.
Take a string and tie the pencil on one end. With it, measure your toddler from the top of the shoulders to the waist. Add about an inch to the length and mark it with your Sharpie.

Tie the Sharpie on the other end of the string, and cut. 
You will use this as a compass to draw circles.

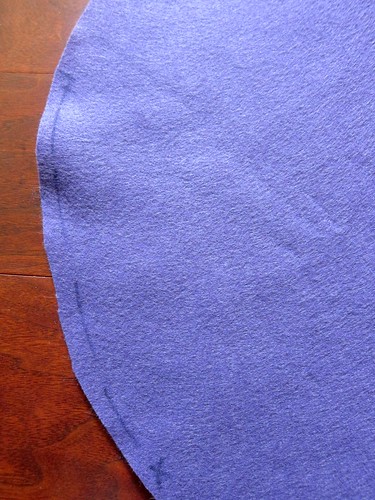
Fold your felt material in half (so you get 2 circles with one cut) and lay it down. Hold the pencil down on the fabric, making sure you have enough to go around, and trace a circle with the Sharpie. Cut out and you will have something like this:

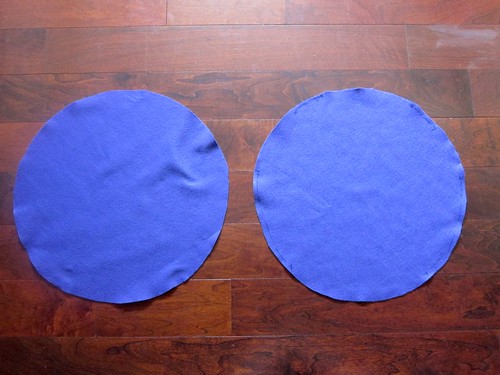
You will need two more circles with the felt, and again with the batting, but this time, they will be about 1.5 inches smaller. So shorten the string and repeat the steps above.

You should have 2 bigger felt circles, 2 smaller felt circles, and 2 batting circles.

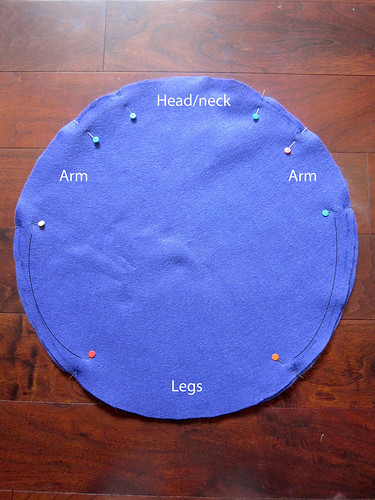
Take one of the bigger circles and lay it over the toddler. You want to roughly mark the areas you need to sew with a Sharpie. You want to leave holes for the head/neck, arms and legs. 

Pin the other larger circle onto this. I know it's a little hard to see, but this is a sad looking diagram I drew for you. It indicates the holes (don't sew there!) and black lines to sew with a 1/4" allowance, or as close to the edge as possible: 

After sewing, turn it right side out, and you will get this:

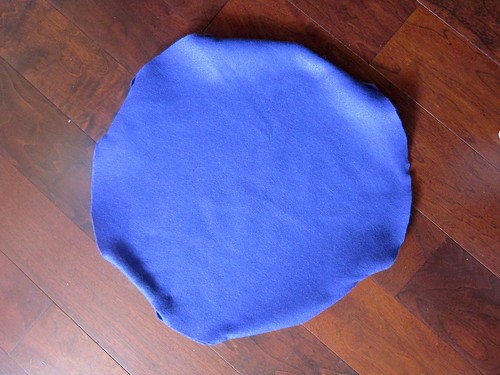
Have no fear! It doesn't look like much, but it will be perfect in no time! 
Cut and trim as needed - and something I discovered -  the trick is to cut the neck and leg holes a bit straighter...less of a circle. When the toddler puts it on, it will create more of a curve. Trust me. It will make complete sense. =)

Now you will create a sandwich of: felt - batting - felt. 
So, turn the sewed circle inside out.
Lay a batting on top.
Lay the smaller felt circle on top of the batting.

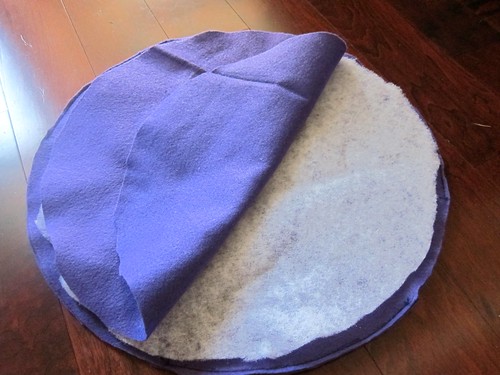
Hot glue the smaller felt circle onto the sewed circle. The glue and batting inside will stiffen the felt in general, and will keep the M&M round shape better. Repeat the "sandwich" on the other side. Turn right side out. You're almost done!

I went online and found a picture of the "M". I traced it on a printing paper, cut it out, traced that onto the white felt, and cut out.

Hot glue the "M" in the middle of the circle, making sure the head/neck hole is up and the leg hole is down.
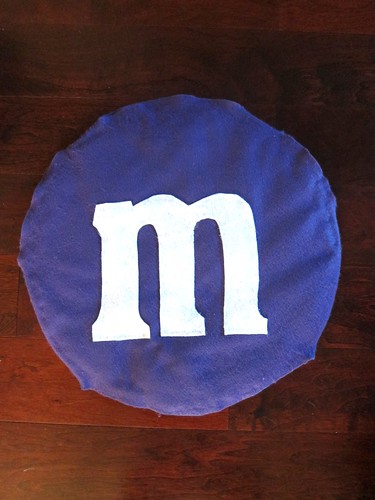
Ta da!

You now have the cutest M&M running around. =)
Good luck!

October 20, 2011

Altering Sleeves

Sliming down big bell sleeves on this cute dress:

And turning it into this cuter dress:

I am definitely not great at sewing but I did acquire some simple skills through the years. I think this is called a French Seam, but don't quote me. =)

I marked a straight line to how I want the sleeves to be, on the front of the dress: 

Then I did a straight stitch on the line. No worries if it's not completely straight:

After sewing, cut the extra fabric off...as close to the stitch as possible:

Now flip the dress inside out, and sew a double straight line (or just a single line) above the line you just sewed (that is on the front of the dress and you can't see). Now you have trapped line and raw edges on the front of the dress inside!

Flip the dress again so it's right side out, and the seam should look like this:

I hope my interactions made sense! 
Ta-da:

Good luck!

August 05, 2011

Fudgesicles

I saw a fudgesicle recipe at www.BakingBites.com.
It was incredibly easy and fast to do. And they are delicious!


Homemade Fudgsicles
2 cups low fat or skim milk
1/2 cup cocoa powder
2/3 cup sugar
2 tbsp cornsyrup or agave syrup
1 tsp vanilla extract
In a medium saucepan, combine milk, cocoa powder, sugar, corn syrup (or agave syrup) and vanilla extract. Bring to a simmer, stirring frequently, and cook just until all of the sugar and cocoa powder is dissolved. Pour hot mixture into popsicle molds and freeze overnight, or until solid.
Makes 6-8 large popsicles (depending on the size of your molds)
I used whole milk instead because that was what I had in my fridge. Also, I poured the liquid through a strainer before pouring into the molds to remove any clumps. It worked like a charm. To release, run warm water on the outside of the mold for a few seconds.

Next time though, I would use a little less coca powder. It was a bit too chocolately for my taste.

July 27, 2011

Cranberry Scones

I searched online for the easiest, most delicious scones recipe. I tried this one from AllRecipes.com and really like it. Scones are best served right out the oven. This recipe makes about 8 scones:


Ingredients

  • 1 3/4 cups all-purpose flour
  • 4 teaspoons baking powder
  • 1/4 cup white sugar
  • 1/8 teaspoon salt
  • 5 tablespoons unsalted butter
  • 1/2 cup dried raisins or cranberries
  • 1/2 cup milk
  • 1/4 cup sour cream
  • 1 egg
  • 1 tablespoon milk

Directions

  1. Preheat the oven to 400 degrees F (200 degrees C).
  2. Sift the flour, baking powder, sugar and salt into a large bowl. Cut in butter using a pastry blender or rubbing between your fingers until it is in pea sized lumps. Stir in the raisins/cranberries. Mix together 1/2 cup milk and sour cream in a measuring cup. Pour all at once into the dry ingredients, and stir gently until well blended. Overworking the dough results in terrible scones!
  3. With floured hands, pat scone dough into balls 2 to 3 inches across, depending on what size you want. Place onto a greased baking sheet, and flatten lightly. Let the scones barely touch each other. Whisk together the egg and 1 tablespoon of milk. Brush the tops of the scones with the egg wash. Let them rest for about 10 minutes.
  4. Bake for 10 to 15 minutes in the preheated oven, until the tops are golden brown, not deep brown. Break each scone apart, or slice in half. Serve with butter or clotted cream and a selection of jams - or even plain.

July 13, 2011

Mini Fruit Tarts


I found the recipe on www.JoyOfBaking.com, and there is even a video!


Pastry Cream Recipe:

1 1/4 cups (300 ml) milk 
1/2 vanilla bean, split lengthwise or 1 teaspoon pure vanilla extract or vanilla bean paste
3 large egg yolks
1/4 cup (50 grams) granulated white sugar
2 tablespoons (20 grams) all-purpose flour
2 tablespoons (20 grams) cornstarch

Optional:1/2 tablespoon liqueur (Grand Marnier, Brandy, Kirsch) 

For lighter pastry cream - fold in 1/2 cup (120 ml) softly whipped cream to cooled pastry cream.

For Chocolate pastry cream - add 2 ounces (60 grams) of finely grated bittersweet or semi-sweet chocolate to the hot pastry cream. Stir until melted.

For Coffee pastry cream - add 1/2 - 1 tablespoon instant espresso or coffee powder to the hot milk.

For Raspberry pastry cream - add 1/4 cup (60 ml) raspberry sauce to pastry cream.


instructions: 
In a medium-sized heatproof bowl, mix the sugar and egg yolks together. (Do let the mixture sit too long or you will get pieces of egg forming.) Sift the flour and cornstarch together and then add to the egg mixture, mixing until you get a smooth paste.

Meanwhile, in a saucepan bring the milk and vanilla bean just to boiling (just until milk starts to foam up.) Remove from heat and add slowly to egg mixture, whisking constantly to prevent curdling. If you get a few pieces of egg (curdling) in the mixture, pour through a strainer. Remove vanilla bean, scrape out seeds, and add the seeds to the egg mixture. (The vanilla bean can be washed and dried and placed in your sugar bowl to give the sugar a vanilla flavor.) Then pour the egg mixture into a medium saucepan and cook over medium heat until boiling, whisking constantly. When it boils, whisk mixture constantly for another 30 - 60 seconds until it becomes thick. Remove from heat and immediately whisk in the liqueur (if using). Stir in vanilla extract if using instead of a vanilla bean. Pour into a clean bowl and immediately cover the surface with plastic wrap to prevent a crust from forming.  If not using right away refrigerate until needed, up to 3 days. Whisk or stir before using to get rid of any lumps that may have formed.

Makes about 1 cup (240 ml). Preparation time: 20 minutes.


I took a short-cut for the pie crust and bought already made dough. So I just rolled it out, cut circles and baked in a cupcake pan. 


I poked the bottoms with a fork:


With extra dough, I cut out little flowers/stars:


The pastry cream cooling down:


I made apricot glaze to brush onto the pie crust before pouring the pastry cream on to keep it from getting soggy:

Apricot Glaze
1/2 cup (120 grams) apricot jam or preserves
1 tablespoon water

Heat the apricot jam or preserves and water in a small saucepan over medium heat until liquid (melted). (Can also heat in the microwave.) Remove from heat and strain the jam through a fine strainer to remove any fruit lumps.

One thing I would have done differently is to pour the pastry cream into the pie crust/tart while it is warm. When the cream cooled, it became thick and sticky. I felt like I had to re-heat it, but I didn't, so the cream got lumpy.


I added strawberries, blackberries and the little flowers as decoration. They were delicious!